Smartphone Food Photography Tips {Part 1}
October 23, 2014
As a registered dietitian nutritionist, I’ve always believed that if you want consumers to eat a healthy diet, you have to give them easy and affordable recipes that work, taste great, and look amazing and appetizing.

This is a gorgeous image of my Homemade Healthy Beefaroni made with lean ground beef, mushrooms and red bell pepper, and whole wheat pasta … and served with fresh asparagus and basil. Don’t you want to take a bite? I took this photo with my iPhone 5s and edited using Snapseed. {Keep reading for my top food photography secrets.}
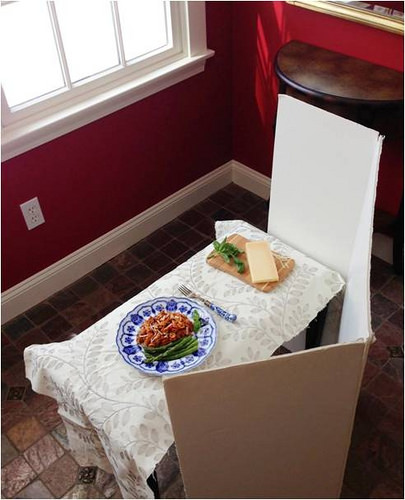
But before I learned how to use my smart phone to take appetizing food photos, here’s what that same recipe looked like:

“No, Mom. You can’t make me eat that!”
With more attention paid to food styling, a better lighting situation, and a few smart phone photography / editing apps, the differences between my “before” and “after” images is quite dramatic. Best of all … IT’S EASY TO ACHIEVE.

Earlier this week, I traveled to Atlanta, GA for the annual meeting of the Academy of Nutrition and Dietetics. The Food & Nutrition Conference & Expo—AKA FNCE—featured an array of lectures and workshops including From Drab to Delicious: Food Photography and Styling Tips for Dietitians, which I taught with Regan Jones, RDN and Janet Helm, MS, RDN.

My portion of the workshop focused on smart phone food photography. What follows are some of the tips and tricks I shared with the group:
Elements of Appetizing Smart Phone Food Photography:
– Use natural light
– Style recipes using interesting backgrounds and props
– Shoot from Above
– Use the Camera+ app to take your food photos (if you have an iPhone)
– Use the Snapseed app to edit your images
– Add fun graphics (if you so desire) with PicMonkey.com
USE NATURAL LIGHT

Things to remember: Avoid the camera flash; shoot in daylight; position the food near a window but avoid harsh light and opt for diffuse, soft light instead; and reflect light back onto the subject using something like a white tri-fold, project board (I purchased mine at Staples for a few dollars.)
FOCUS ON INTERESTING BACKGROUNDS & PROPS

Things to remember: Use surfaces with texture such as an old piece of barn board, a rustic table, or an interesting background board; use props that pop; layer plates, bowls, and linens; use relevant garnishes; and when choosing props, use those that reflect the personality of your recipes and your readers. At Liz’s Healthy Table, I aim for playful, colorful, and family friendly.

For this smart phone photo, I used a DIY photography background board, a yellow plate topped with a white bowl, an inexpensive fabric swatch from Joanne Fabrics, a lime wedge and baked corn chips, and colorful soup toppers: cilantro, shredded cheese, and sour cream.
SHOOT FROM ABOVE

Things to remember: Smart phones don’t have the same depth of field as a DSLR camera, so your best shot is from above. Shooting from the side rarely looks as good because everything will be in focus (i.e. you can’t fuzz out the background). Don’t these roasted, pickled beets look deee-lish?!
USE CAMERA+ IF YOU OWN AN iPHONE

If you don’t have an iPhone, you can skip this part of my post. Camera+ is for iPhone only, and I use it instead of my phone’s built-in camera. It allows for touch focus and touch exposure, so you can bring more or less light into the shot depending on the amount of light you’re working with. In other words, if it’s a cloudy day outside and you’re in a low-light situation, the touch exposure feature will help you pull more light into the shot. Once you shoot your image, you can save it to your camera roll. FYI: I do NOT edit on Camera+.
POST PRODUCTION
The real magic begins when you edit. In my next post, I’ll tell you all about Snapseed, my favorite smart phone editing app. (Snapseed is available for Android and iPhone.)

During the workshop, participants were assigned to one of six food stations and asked to style a scene. Here, you see a grain and veggie salad served up in various bowls. The artificial lighting in the convention center room was dreadful, but that didn’t stop me from ultimately getting a great shot. I took this image with my Camera+ app (this was the best I could do given the situation), and then I edited on my phone using the Snapseed app.
Here’s the “after” image!!

In Part 2 of my Smart Phone photography post, I’ll tell you how I cropped, white balanced, brightened, and sharpened this image. The improvement was amazing and appetizing, and this image would certainly look more appealing in a blog post or shared on Pinterest, Twitter, or Facebook 🙂
As food professionals, we need to put our best feet forward, and smart photos can help all of us achieve that goal.

Just had to give a shout out to my co-presenters: Janet Helm, RDN, winner of this year’s AND Media Excellence Award, and Regan Jones, RDN, co-founder (with Janet) of Healthy Aperture and The Recipe Redux. These women inspire!
I was able to attend the food photography pre-workshop this year and was really impressed with your iphone tips, Liz! I am so excited to start trying to use some of your tips while out and about when I don’t want to lug around my DSLR. 🙂
Awesome. If you ever need help, don’t hesitate to get in touch. And have fun!
Great tips! I usually depend on my DSLR for my food photos, but it’s good to learn some pointers about the smart phone. I’ll try taking more photos from above and see if my pictures come out better. Thanks!
Love this! I need to work more on my food styling/food props for sure!
Appreciate this recap so much, Liz! I was unable to attend FNCE this year— and this was one workshop I was so bummed in missing! Can’t wait for part 2!
Hold onto your hat Katie, because Part 2 is going to rock!
Thanks so much for this! I exclusively use my phone for taking food pictures and only recently started making more of an effort into making it look good (sigh). Someday, I’m hoping I’ll be able to get back to the older ones to revamp em’. This will definitely be helpful! :]
I hear ya. I wish I had time to re-visit our old blog posts. That said, the image of the black bean soup in the post is a re-do for us, so yes, we do find the time to give some of our older images a makeover!
Thanks for all of the tips! I can’t wait to read Part 2. My DSLR is ancient and I really don’t know how to use it beyond the automatic setting (shh…don’t tell Regan!) so I’ve been using my iPhone 5 more for photography. I’ve shot with Camera+ for awhile and have tinkered with SnapSeed so can’t wait to read your tips to learn how to do a better job editing.
Thanks Holley. The “before” and “after” impact from Snapseed is mind blowing. I”m working on Part 2 now!!
Thanks so much for sharing these tips! I had another commitment and couldn’t make your session.
Liz, you all did a WONDERFUL job, and your phone camera tips are great. So easy to take a photo, especially when on-the-go, adjust and upload. Thank you for being such a generous and knowledgeable colleague!
Thank you for sharing your knowledge with RDs!!! If the food doesn’t look good, no one cares. So good to meet you both at some point during FNCE.
Great meeting you too, Carlene. As for gorgeous food photos, you have nailed it!!
Great info! I never knew about the iPhone app. I need to check it out!
Wow, those photos taken with an iphone? They look like DSLR quality! Thanks for all the tips!
You are most welcome, Arman. My brain is not DSLR friendly, so it’s the smart phone for me every time!
These are SO helpful!!! I actually do quite a few of them, and use camera+ and snap seed, but loved the hints on shooting from above and layering dishes. My biggest problem is finding the right props. Working on it though 🙂
Tina, my go-to sources for props are Home Goods (so inexpensive) and tag sales. Every time I see a sign for a tag sale, I pull over! Talk about inexpensive!! In Part 2 of the post, I’ll share some of my Snapseed secrets, so stay tuned 🙂
These are great tips. Thanks! I have a DSLR, but I still take most photos from my phone.
It’s amazing how a few tweaks w/ the phone can really bring a photo to life! In Part 2, I’ll focus on editing, which really has a huge impact!
Hey Liz, This is great. Can’t wait for part 2. Thanks for the hands on help. I need to send you my “airport meal” before and after. :o)
Yes, I want to see your before and after. In Part 2 of the series, I’ll get more into Snapseed. Anyway, send along so I can check out all your handiwork!!
Liz, thank you so much for posting these tips. I was in meetings all day and missed y’all’s workshop. Looking forward to trying Camera+ and to reading your post on Snapseed!
Great tips.
Thanks for sharing!
My pleasure!
Thanks for sharing these great tips! I wasn’t able to make it to FNCE this year, & now I don’t feel so out of the loop. Now to work on great background boards!
http://www.betrulynourished.com
oh how i love snapseed! brilliant!
Oh my goodness, GREAT tips! Thank you so much Liz! Great to see you at FNCE!!
Taking copious notes. I’m 100% using my iphone as camera. Never heard of either Camera+ or Snapseed. Will check them out. Thanks so much for tips!!
I’ve been struggling with my iPhone food photography for months and I just came across your post. Just downloaded snapseed and I’m blown away!!! Thank you!
Have fun! Let me know if you have any questions. Always happy to help 🙂
Thanks for the tips! I am new to food photography and keep feeling defeated because I don’t have a fancy camera and am not that good at iPhone photos. This blog post have given me more confidence to keep practicing!
I have a question regarding lighting. I work full time (during the day), and blog in the evenings – so most of my photos are done with little to no natural light, unless I find some time on the weekends. Do you have any tips for taking photos in artificial light?
Hi Brittany: Artificial light is indeed a big challenge. It leads to shadows and throws off the light balance. There’s not much you can do about shadows other than being mindful not to cast a shadow on your food w/ your phone, but you can tweak the white balance with SnapSeed app. When you import your photo into SnapSeed, go to the Tune Image setting and then scroll down to Warmth. You can adjust the white balance by making your image warmer (more orange) or cooler (more blue). By playing with Warmth, you can fix a photo that might be too orange-y from artificial lighting. If I were you, I’d shoot as much as possible on weekends, or aim for the morning (though I realize that may be too hectic). Good luck with your photos and reach out any time with more questions!!